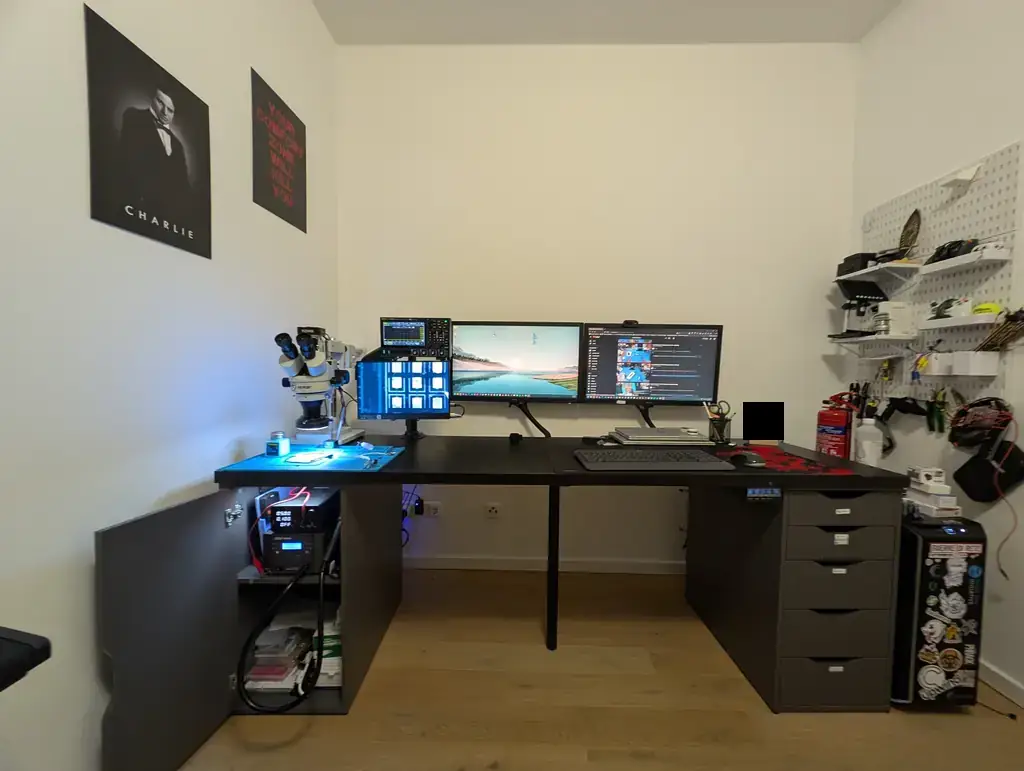
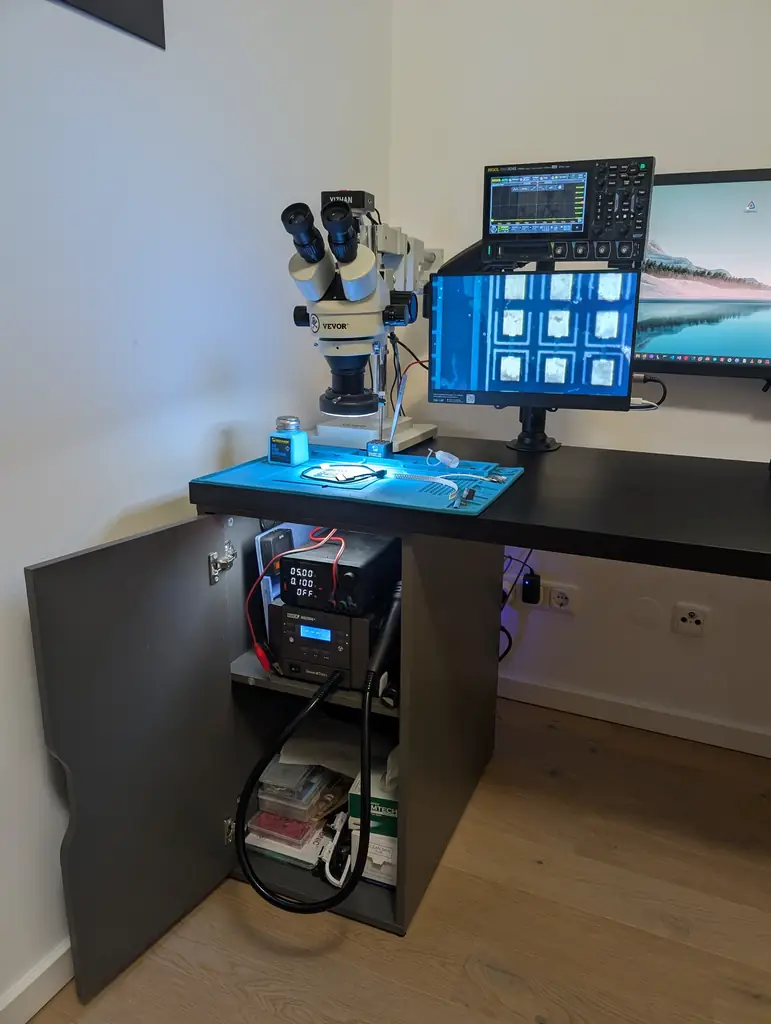
Lately I’ve been working a lot to improve my small hardware lab in my studio. The biggest change is the addition of an optical microscope. Here’s what it currently looks like, followed by a breakdown of what I have.
no exif, sorry :(
General layout
The right side is the area dedicated to work, which is usually a mess of devices and cables. Each monitor can be switched independently between my full-tower on the right and the laptop using some buttons under the desk, and a USB switch (also with a button under the desk) does the same for all the peripherals.
The left side is the hardware lab area. I didn’t want to take too much space from the work area so I had to squeeze every centimeter I had. It’s usable, and considering the constraints I doubt I could have done anything better.
Microscope
I researched this topic for weeks and changed my mind many times, but I knew from the beginning I wanted an optical one. Good quality digital microscopes are still quite expensive, and by spending a few hundred more you can get a full optical stereo microscope, which gives you depth perception. I wanted to stay under a thousand for the microscope and all the accessories.
Basics
For electronics the obvious choice is a simul-focal trinocular stereo with a Barlow lens. It’s the only choice that will give you some space to use hot air or use your hands to tinker with a PCB without moving the microscope away and while recording the whole process.
Some explanation for the terms I’ve used:
- Stereo: it’s the kind of microscope that has two separate optical paths, one per eye, to give you a three-dimensional visualization of the item. The other common kind, the compound microscope, is made for looking at thin samples with light passing through them. It has much higher magnification but the lens sits almost on top of the sample, so there’s no room to work.
- Trinocular: it has three ports, where the third is used to plug in a camera. Your eyes can be strained by looking too much into the oculars directly, so you may want to watch a monitor from time to time. Not to mention you may want to record what you’re doing in case you accidentally knock off a small cap without realizing it (may or may not be based on a true story).
- Simul-focal: it means you can use the camera and both oculars at the same time. Not every trinocular is like this: if it isn’t, there’ll be a lever that diverts the light of one of the two optical paths to the camera. You can still look with the other eye, but while recording you lose the stereo view.
- Barlow lens: it’s an extra lens screwed onto the bottom of the body that multiplies the magnification. A 0.5x will halve the magnification but will increase the working distance (the space between the lens and the item), typically from about 10cm to 16-18cm. That’s what gives you a reasonable space to work with the item.
Main components
A microscope has four main components: oculars, body, Barlow lens (optional but needed for electronics), and stand.
Oculars
The oculars are the part you look through. They may have a 10x or 20x magnification but the default is usually 10x. You don’t need to go higher than 10x for electronics, even for small (e.g., 01005) components, and higher magnification oculars also give you a narrower field of view.
Oculars usually have an eye glasses symbol on them. Those are called “high eyepoint” oculars and they’re meant to be usable with glasses, as your eyes have to stay further away from the lens. If you put your eyes too close you’ll see black shadows and a vignetted image. Without glasses you just have to keep the same distance, so they’re perfectly usable by people without glasses as well.
Usually at least one of the oculars (sometimes both) has a diopter adjustment to compensate for differences between your eyes. With only one adjustable ocular, you first focus with the other eye using the focus knob, then turn the diopter ring until the image is sharp for the second eye as well. It’s best to do this at maximum zoom and then check that the image stays in focus when zooming out.
Body
The body of the microscope is the central piece. It will usually have at least a knob to adjust the zoom.
It’s very common to find bodies with a zoom between 0.7x and 4.5x. You’ll usually stay on the lower side for electronics. As mentioned, if the microscope is not simul-focal you’ll also have a lever to switch between oculars and camera.
Barlow lens
The 0.5x is the usual choice for electronics because it gives you the most working space. A 0.7x or 0.75x is sometimes used when you need a bit more magnification on very small components, but the 2x ones are for completely different applications.
Stand
The stand holds the body through a focus mount, which has the knob to move the body up and down to focus.
The most common stands are: pillar (the body slides on a vertical post fixed to a base), articulating arm, single arm boom stand and double arm boom stand. A pillar stand is cheap and stable, but the post is right behind the item and the base limits how big the thing you’re working on can be. I went with a double arm boom stand as it’s the most stable and sturdy of the ones that give you free space under the microscope. I think the base alone is easily 15kg, which prevents the whole thing from tipping over even when the arm is fully extended. I didn’t want to deal with any articulating arm, as it would likely wear out from holding all this weight over time.
Total magnification
The total magnification is the product of the magnifications of all the components between your eyes and the item you’re working on. For example, if you have 10x oculars, 0.7x zoom set on the body and a 0.5x Barlow lens the math is: 10 x 0.7 x 0.5 = 3.5x.
It follows that if the body’s zoom can vary between 0.7x and 4.5x (which is typical of every microscope I’ve seen so far) you would have a total magnification of 7x to 45x without a Barlow lens, 3.5x to 22.5x with a 0.5x Barlow lens, and 14x to 90x with a 2x Barlow lens.
This only applies to the oculars. What you see on the monitor depends on the camera adapter, the sensor and the size of the monitor.
Accessories
The main pieces you’ll need for the microscope are a ring light, a camera, and a C-mount adapter for the camera.
I didn’t research any of these topics extensively to be honest. I simply bought a random ring light and a random camera. If you’re interested in the topic, nanofix made a good comparison of cameras.
I found out the hard way that the camera also needs a dedicated lens between the sensor and its port on the microscope. The microscope usually comes with an empty tube (a “1x” adapter), which doesn’t work very well with the camera. The image that comes out of the port is too big compared to the sensor, which means the camera only sees the central part of it. You may also get a lot of chromatic aberration without a lens. You’ll probably need a reduction lens around 0.3x like this to see the whole field, but the right value depends on the size of your camera’s sensor.
Brand
This is the topic I researched the most, and I think I’ve memorized all the letters and models for many brands. They’re not explained anywhere, so you have to figure out by yourself that, for example, one letter in the model name means simul-focal and another one means it isn’t. Knowing them helps you quickly decide whether a price is fair or not.
The only real option to stay under a thousand for microscope and accessories is either AmScope or an unbranded Chinese model.
I went with the latter. They’re several hundred cheaper than the AmScopes and I found some very good reviews of them, although none compared them directly with AmScope. According to some OSINT I read somewhere on Reddit (you decide whether to trust that or not), they’re made in the same building. That doesn’t mean the quality is identical but I do not regret the choice. I’m able to work very well even on small items, such as smartwatches.
Other equipment
This is the rest of the equipment I currently have, mostly in the cabinet on the left under the desk (no affiliate links, I’m not famous enough):
- Rigol DHO924S oscilloscope. 250MHz, 4 analog, 16 digital, 12 bits, 1.25GSa/s. I love the fact it’s running on Android (although I believe it’s Android 7, so I don’t have any plans to connect it to the network) and that it’s completely unlocked with the SoC download mode enabled (so it’s basically unbrickable).
- Quick 862DW+ hot air station. Super powerful, does its job, 10/10
- A random Chinese programmable power supply like this
- Pinecil v2 with a bunch of microsoldering tips (e.g., this)
- 200W GaN 8-port power supply on the back of the desk to power everything
- PinePower desktop on the left under the desk, near the drawers
- CPB heated mat. It’s made mostly for smartphone repair and frankly it became a bit useless since I got my Quick, but I still find it pretty useful for pre-heating and it takes way less space than a full-blown pre-heater.
Future improvements
The next big improvements I’d like to make in the coming months are:
- A bench multimeter like this
- A proper 3-stage fume extractor
- An ultrasonic cleaner