DM-verity is a technology (or better, a “device-mapper target”) that provides integrity checking on block devices using a cryptographic digest supplied by the kernel crypto API.
1 - System installation
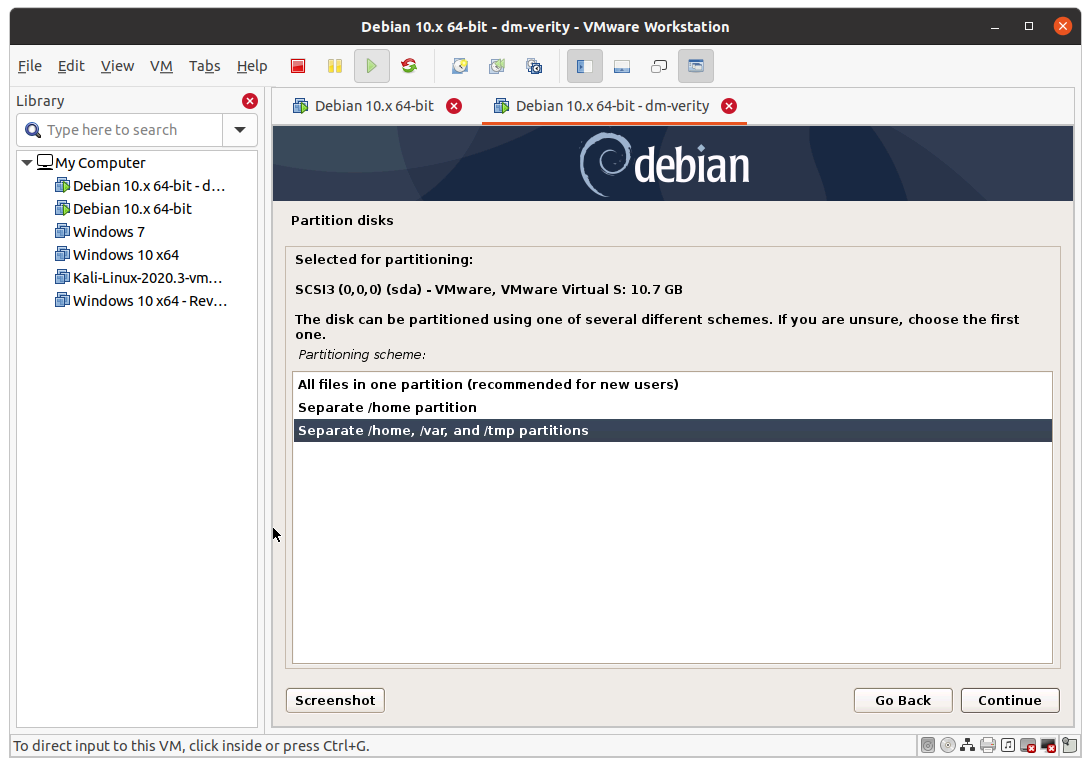
To make dm-verity works, the system should be able to work with a read-only root. As a playground, it is possible to use a minimal Debian installation on a VM. At first, create a VM with at least 10GB of space and install Debian. Download and connect to the machine Debian-netinst, then start the VM and install Debian. Pay attention to select “Separate /home /var and /tmp on partitions”, as shown in the image below.
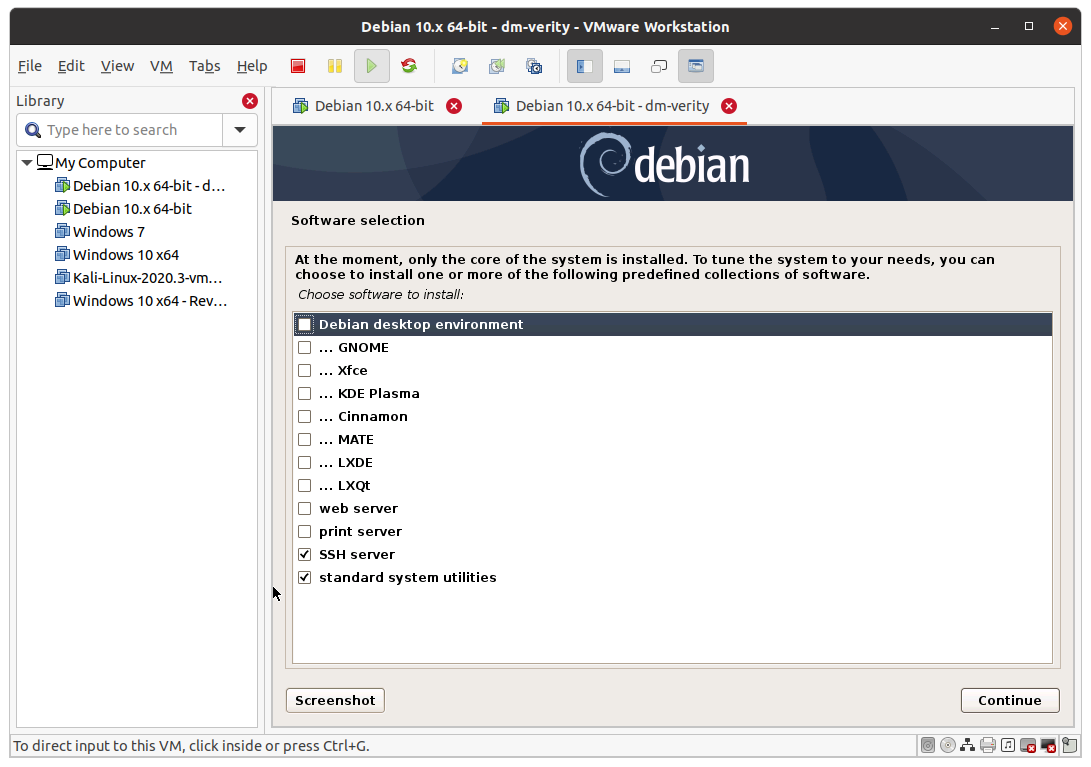
To speed up the process, it is possible to leave all the default options to not install a desktop manager, as shown in the image below.
Once the system is installed, boot it.
2 - Move /boot to another partition
Once dm-verity will be activated, the kernel will need to have the file-system’s root hash to verify that the system is integer. The root hash cannot be stored in the root partition, as it is indeed the result of the hashing of the root partition.
To make things work, a separate partition for the boot image is also needed. Alternatively, during installation, it is possible to configure a manual partition layout and specify from the beginning that /boot has to be in a different partition.
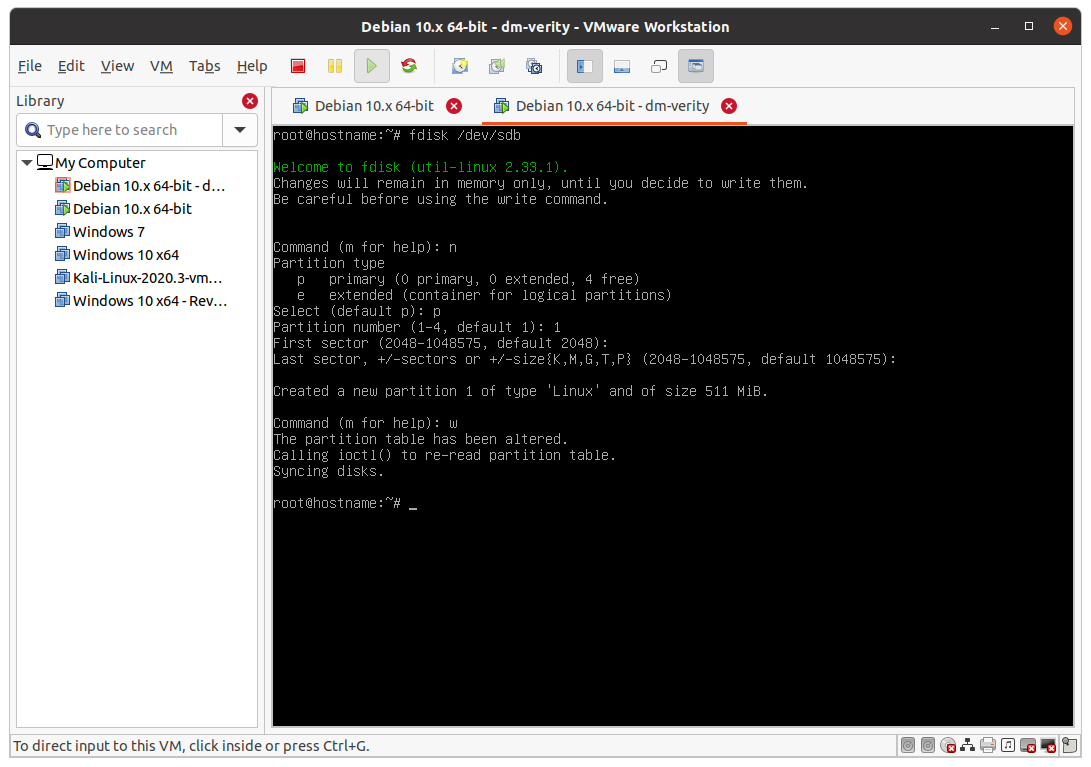
The most straightforward approach is to connect another disk to the virtual machine manager (500MB is enough). This guide will assume this is /dev/sdb. Once connected the 2nd hard-disk, run:
# Get a shell as root
sudo su -

# Make the partition /dev/sdb1
fdisk /dev/sdb
# Press, in order: n, p, 1, (enter), (enter), w
At the end the situation should be this:
Configure the partition and update fstab:
# Format the partition with
sudo mkfs.ext4 /dev/sdb1
# Mount the partition
mkdir new_boot
mount /dev/sdb1 ./new_boot
# Copy the content from /boot to ./new_boot, preserving permissions
cp -rp /boot/* ./new_boot/
# Append the output of blkid /dev/sdb1 (containing the UUID of /dev/sdb1) to /etc/fstab
blkid /dev/sdb1 >> /etc/fstab
# Modify /etc/fstab to create a proper entry with this UUID
vim /etc/fstab
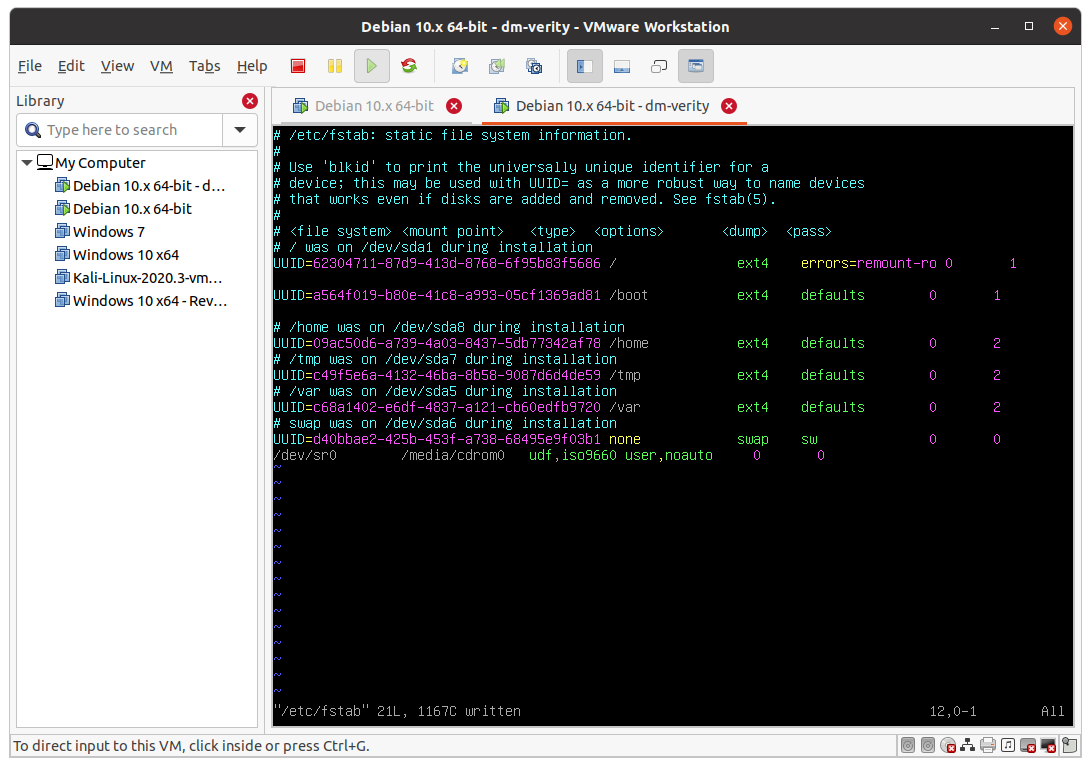
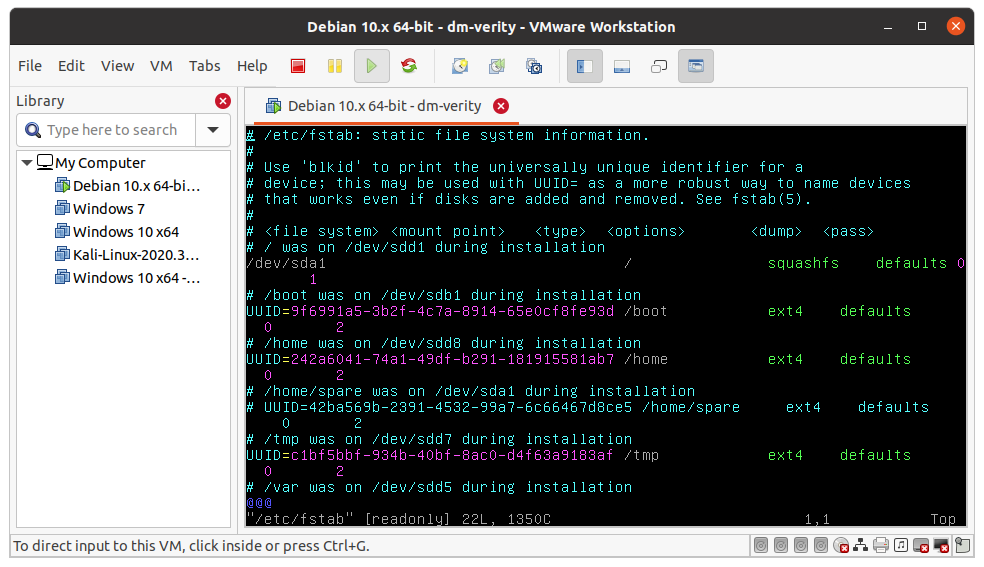
At this point, if the UUID of /dev/sdb1 is a564f019-b80e-41c8-a993-05cf1369ad81, /etc/fstab should look like this:
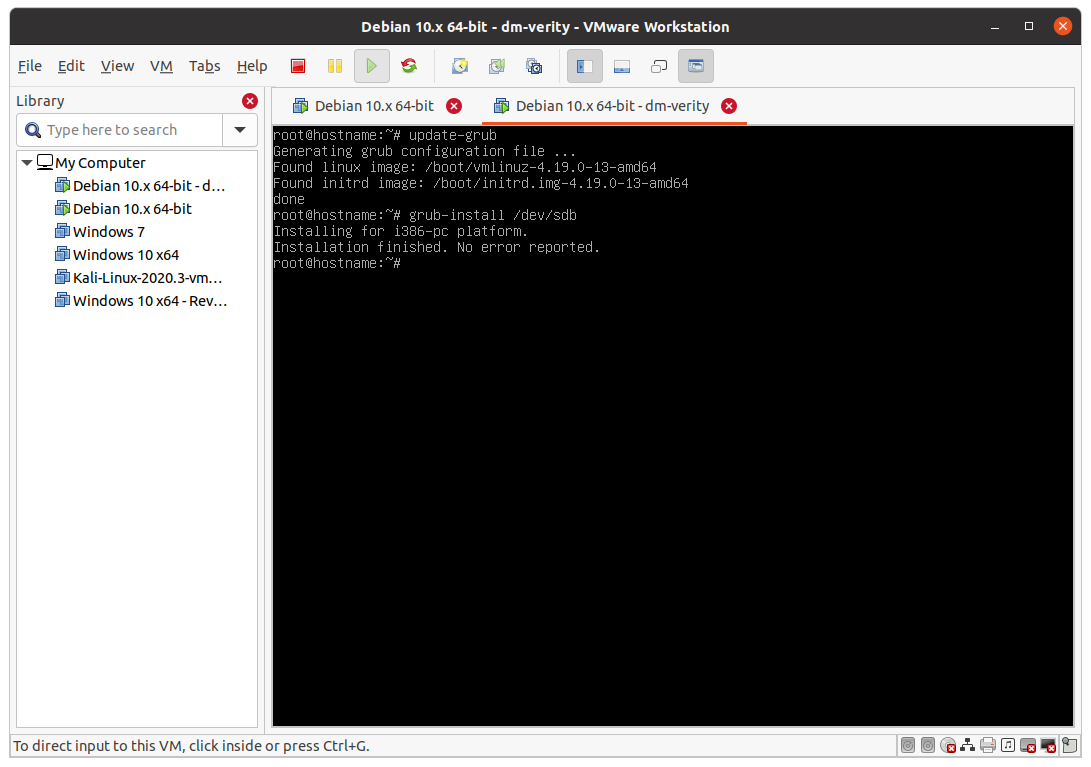
Once /etc/fstab is updated, it is needed to reconfigure grub:
# Update grub with the right root and prefix
update-grub
# Install grub also to the disk that contains the /boot partition
grub-install /dev/sdb
The output should look like this:
To avoid a clash between the old /boot and the new boot:
# Rename /boot to /old_boot
mv /boot /old_boot
# Create a new directory that will be used by fstab/udev to mount the boot partition
mkdir /boot
At this point, it is possible to reboot the system. The last step is to reconfigure the VM manager’s BIOS to boot the 2nd disk first.
After boot, you can make sure that everything is working by running the command mount without arguments. The output should look like this:
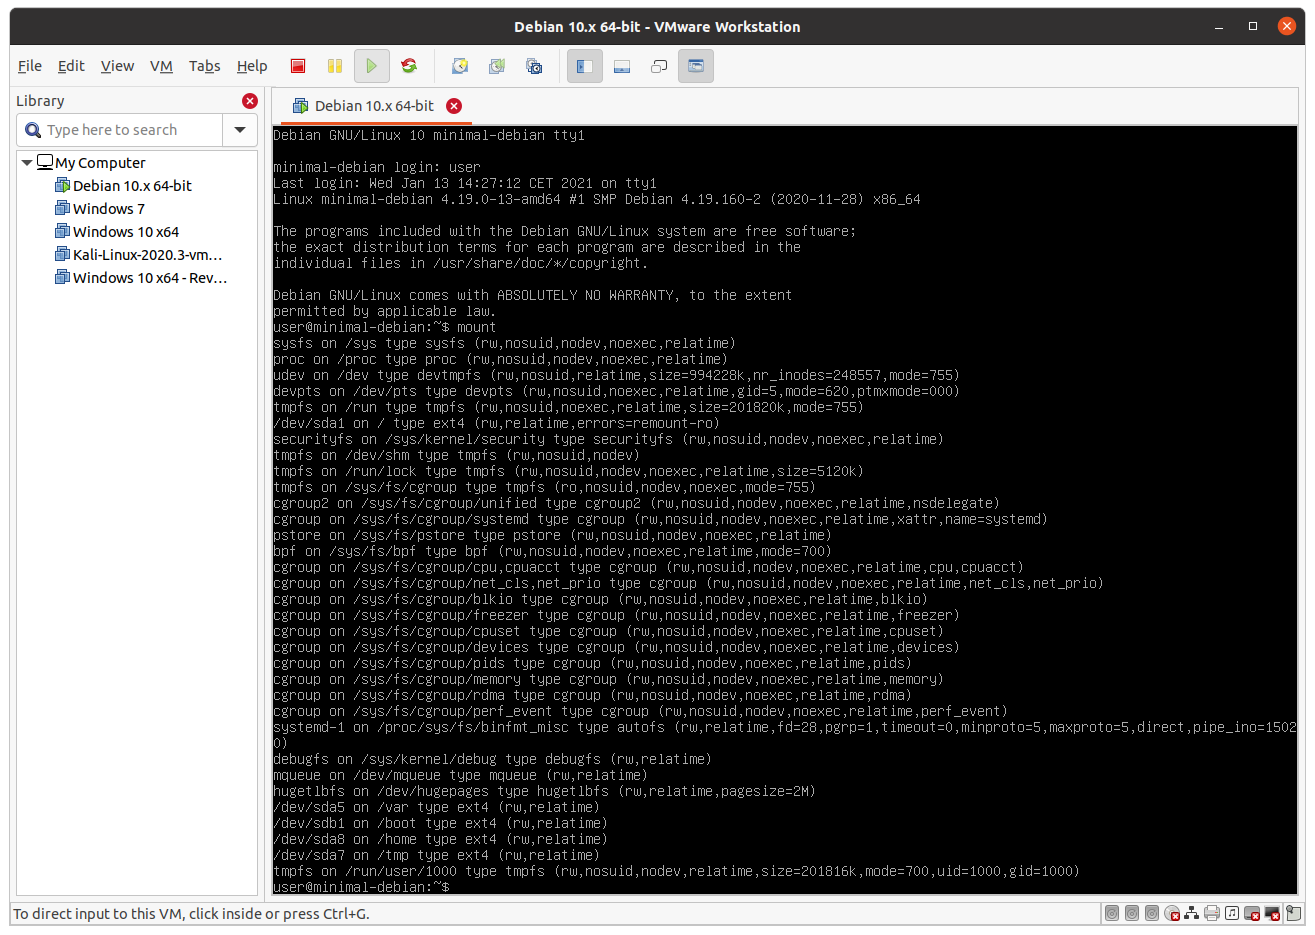
It is possible to see that /dev/sdb1 is mounted in /boot.
3 - Recompile the kernel
To use as root a mapper device, it is needed to mount it before the init execution.
It is possible to do this in 2 ways:
- By altering the script /init of the initramfs to make it configure the mapper
- By specifying a parameter to the kernel that will instruct the kernel to do everything by itself
It is needed to recompile the component in both cases since, by default, neither busybox nor the kernel on a plain Debian 10 installation supports what is required to create the device.
The kernel needs to be upgraded from the version 4.* that Debian 10 is using since the option that is needed is available starting from Linux 5.1. It is possible to upgrade the kernel by adding the backport repository to APT.
sudo su -

# Add buster-backports to sources.list and download/decompress kernel source code
echo deb https://deb.debian.org/debian buster-backports main >> /etc/apt/sources.list
sudo apt update
sudo apt install kernel-source-5.9 kernel-config-5.9
tar -xaf /usr/src/linux-source-5.9.tar.xz
cd linux-source-5.9

# Alternatively, download the latest kernel from linux.org
https://cdn.kernel.org/pub/linux/kernel/v5.x/linux-5.10.7.tar.xz
tar -xaf /usr/src/linux-5.10.7.tar.xz
cd Linux-5.10.7

# At this point, either:
#    1) Use the Debian config (from kernel-config-5.9 package) that is very bloated,
#       slow to compile and require a lot of space but require less tuning
zcat /usr/src/linux-config-5.9/config.amd64_none_amd64.xz >> ./.config
make oldconfig

# Or 2) Start from a default config and add what is needed to make it bootable later
make x86_64_defconfig

# Install prerequisites to build the kernel
sudo apt-get install build-essential bc kmod cpio flex libncurses5-dev libelf-dev libssl-dev bison

# Open menuconfig
make menuconfig

# Find the following options in the menuconfig and change them as described:
#    Device Drivers → Multiple devices driver support (RAID and LVM) →  Device mapper support → change to * (YES)
#    Device Drivers → Multiple devices driver support (RAID and LVM) →  Device mapper support → DM "dm-mod.create=" parameter support → change to * (YES)
#    Device Drivers → Multiple devices driver support (RAID and LVM) →  Device mapper support → Verity target support → change to * (YES)
#    File systems → Miscellaneous file-systems → SquashFS 4.0 - Squashed file system support → change to * (YES)
# If you're starting from x86_64_defconfig, at this point, add what you need to make the kernel work on your VM manager.
# For example, on VM Ware 16, the SCSI controller driver is missing:
#    Device Drivers → Fusion MPT driver support → Change to * (YES)
#    Device Drivers → Fusion MPT driver support → Fusion MPT ScsiHost driver → Change to * (YES)
# Instead, if you started from Debian config, remember to disable change the following option:
#    Cryptographic API → Certificate for signature checking → Provide system-wide ring of trusted keys → Set it to ""

# Compile and install the new kernel
make -j8
sudo make modules_install
sudo make install
After this, it is possible to reboot the system and make sure everything is working properly.
Optionally, it is possible to clean the system from temporary files and install/configure other tools, since starting from the next step, the system will be read-only.
4 - root in read-only
Now it is needed to setup the root file-system as read-only to proceed with the activation of dm-verity. This section is divided into two parts, depending on the file-system chosen.
4.1 - squashfs (alternative to step 4.2)
To create a squashfs file-system, boot from a Live Linux and mount the root file-system and the home partition:
sudo su -
mkdir ./root
mkdir ./home
mount /dev/sda1 ./root
mount /dev/sda8 ./home
Install the tools that will be used:

apt update
apt install squashfs-tools cryptsetup-bin vim
Create the squashfs image:

mksquashfs ./root ./home/root.squashfs
# Unsquash it again to make it easy to modify and repack the file-system
cd home
unsquashfs ./root.squashfs
# Edit fstab to make it mount the squashfs partition as root
vim ./home/squashfs-root/etc/fstab
# The squashfs image needs to be flashed somewhere. This place can be /dev/sda1, but, in this case, if there are some mistakes, the system won't boot anymore. Another solution is to create and plug another disk.
Supposing the chosen disk where to flash the image is /dev/sda1, fstab will look like this:
Now it is possible to repack the image again and flash it:
rm root.squashfs
mksquashfs ./squashfs-root/ ./root.squashfs
dd if=./root.squashfs of=/dev/sda1
sync
4.2 - etx4 (alternative to step 4.1)
For ext4, to put the root in read-only, inside /etc/fstab change the 4th column of the line related to /to specify only “ro”. At the end, the file should look like this:

Reboot the system. Make sure everything is working trying to create a directory in /. The operations should fail:

5 - Activation of dm-verity
At this point, everything is ready to enable dm-verity. This operation can be done if the root partition is not mounted; otherwise, it will fail. Because of this, it is important to boot from a live system.
Since dm-verity needs to store this hash-tree somewhere, the most simple thing is to create another hard-disk where to store this information. Making a hard-disk of 1GB is enough for this purpose. This tutorial will assume that this disk is /dev/sdc.
After the new hard disk is created and connected to the system, proceed to partition it as shown before, running:
fdisk /dev/sdc
# Press, in order, n, p, 1, (enter), (enter), w
There are two possible approaches to enable dm-verity:
- The first is with the use of dmsetup, a tool used to create a mapper device. Since it is possible to use a mapper for different purposes, this tool is not specific for dm-verity and must be invoked in a certain way to enable the usage of dm-verity.
- The second is with the use of veritysetup, which is a more high-level tool that can configure a device-mapper device that is specific for dm-verity. Under the hood is doing the same thing as dmsetup, but it’s easier to use since it’s made for dmverity.
This tutorial will use the second approach.
Mount a writable partition as general-purpose storage, for example, the /home partition (it will be needed later):
mkdir storage
mount /dev/sda8 ./storage
Create the hash tree and save the root hash into the storage:
cd ./storage
veritysetup format /dev/sda1 /dev/sdc1 > output_veritysetup
The content of output should be something like this:

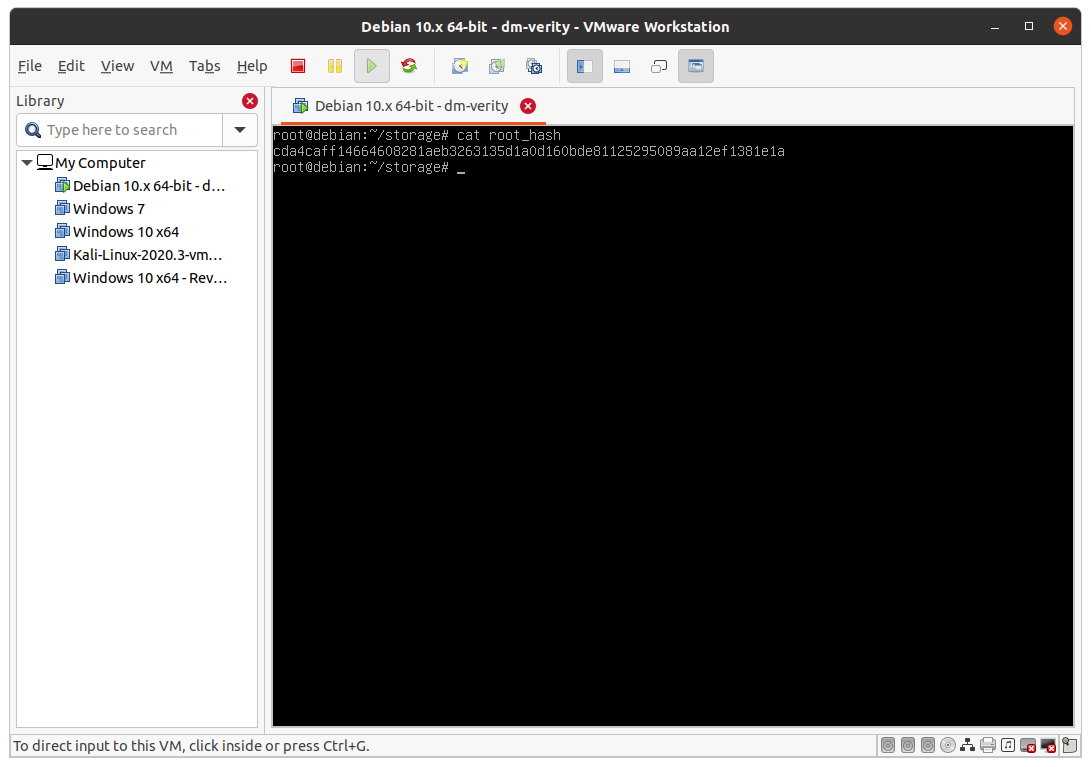
To simplify subsequent steps, create a root_hash file and copy into that only the real root hash (remove other output from veritysetup):
At this point, it is possible to test that everything is working properly by creating the device-mapper device and test it:
veritysetup create vroot /dev/sda1 /dev/sdc1 $(cat root_hash)
# Ensure the system is integer
veritysetup verify /dev/sda1 /dev/sdc1 $(cat root_hash) # It will take a while. If no output is produced, it means everything is OK
# Mount the partition with dm-verity enabled
mkdir verity-root
mount /dev/mapper/root ./verity-root
Output will look like this:
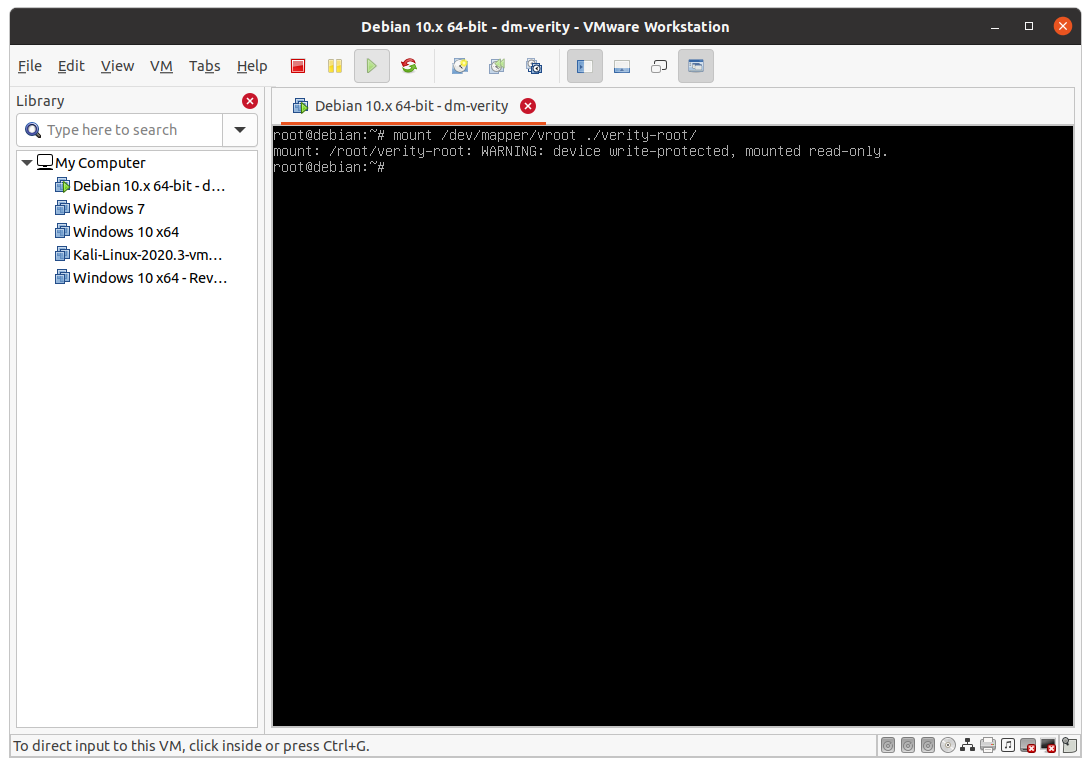
At this point, verity-root contains the mounted root file-system with dm-verity enabled. Every change to the file-system will corrupt dm-verity hash-tree and make the system unusable.
6 - Make it bootable
At this point, the only part that is left is to tell the kernel to create/use the device mapper. To do this, it is possible to use the kernel argument “dm-mod.create” and change the root argument.
dm-mod.create accept as parameter the mapper table that we can obtain easily with the output of the command dmsetup table:
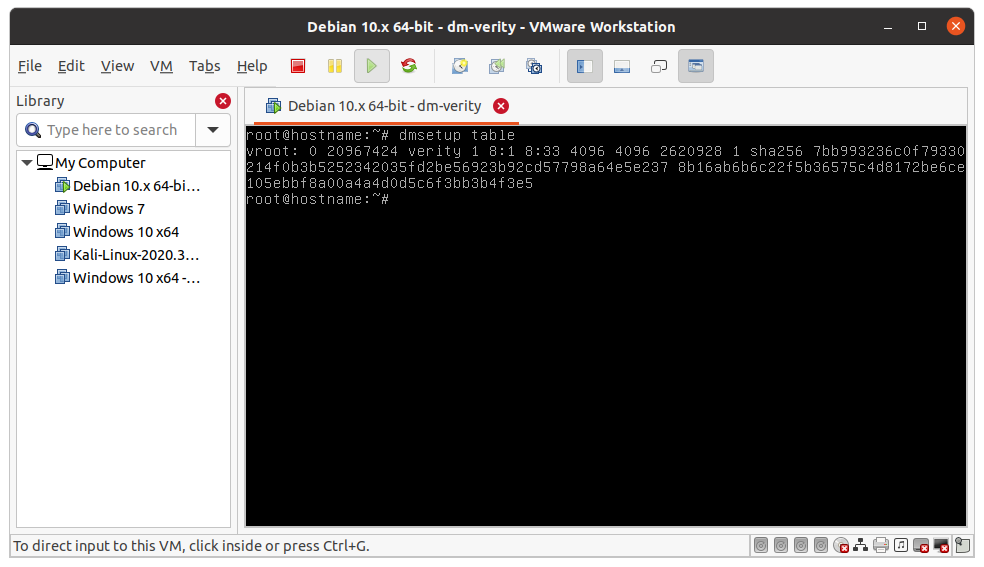
What it is needed to specify to dm-mod.create is an argument that takes the shape of <name>,<uuid>,<minor>,<flags>,<output of dmsetup table>:
- name: Name of the mapping that udev will assign after boot so that the device-mapper could be found
/dev/mapper/<name> - uuid: optional UUID to assign to the device-mapper after creation
- minor: minor of the dm device to make it possible to find it in
/dev/dm-<minor> - flags: flags, like read-only
- output of dmsetup table: literally the output of dmsetup table without the first part that contains the name of the mapping followed by a colon
After putting together these information, we can put the argument inside /boot/grub/grub.cfg. The final line related to the kernel loading will look like this:
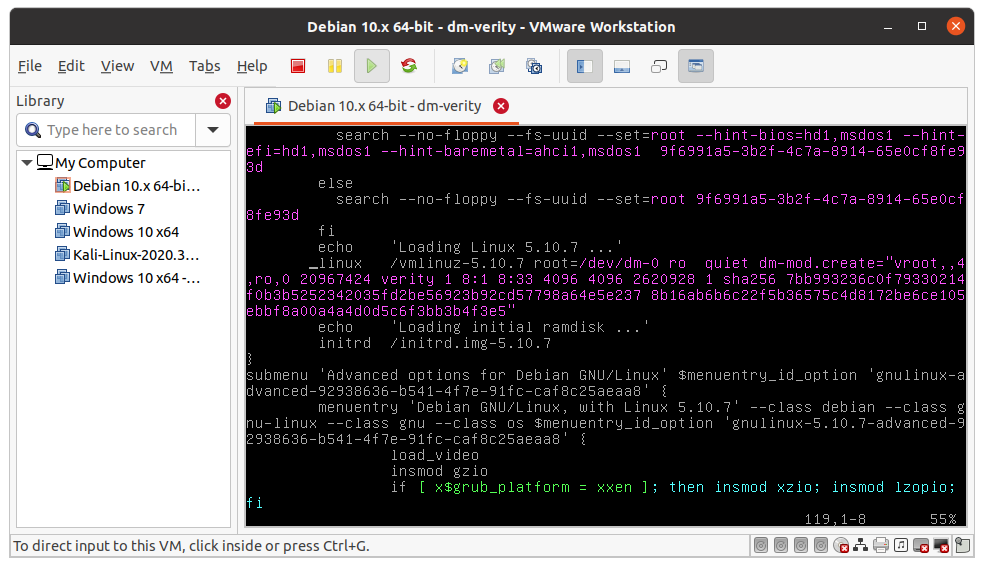
Note that the root argument has been changed to map the new device: /dev/dm-<minor>. Pay attention when updating grub as the modification /boot/grub/grub.cfg will be lost. To make a permanent modification, edit the default grub config file inside /etc.
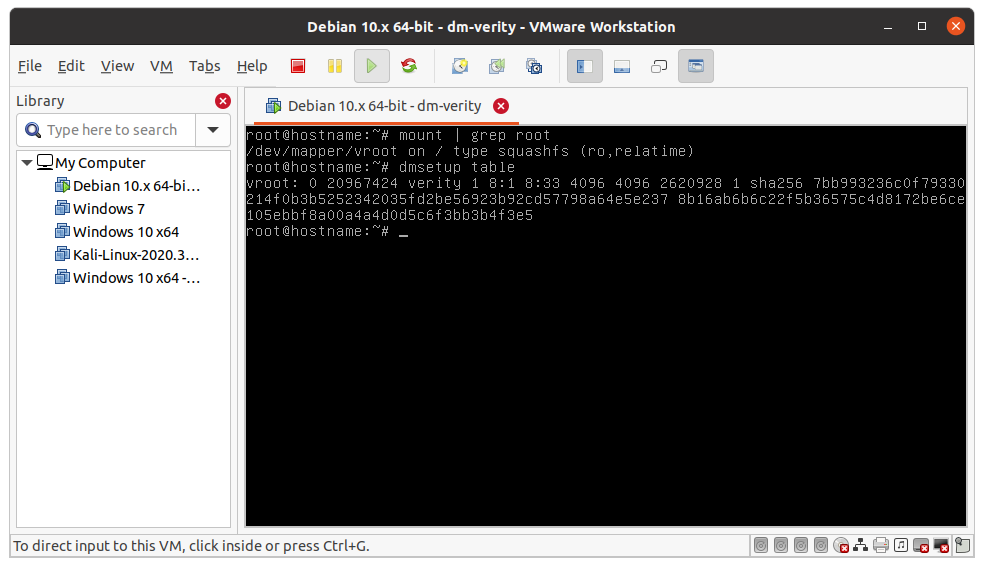
At this point, it is possible to reboot the system. After rebooting the output of mount | grep root and dmsetup table should look like this:
References
- Kernel documentation - Device Mapper
- Cryptsetup documentation - dmverity
- Introduction on dm-verity on Android
- RedHat documentation - LVM - Device mapper
- Gentoo documentation - Device mapper
- squashfs as read-only filesystem
- Android documentation - Android verified boot
- Bootlin - Verified boot
- Integrity lifecycle